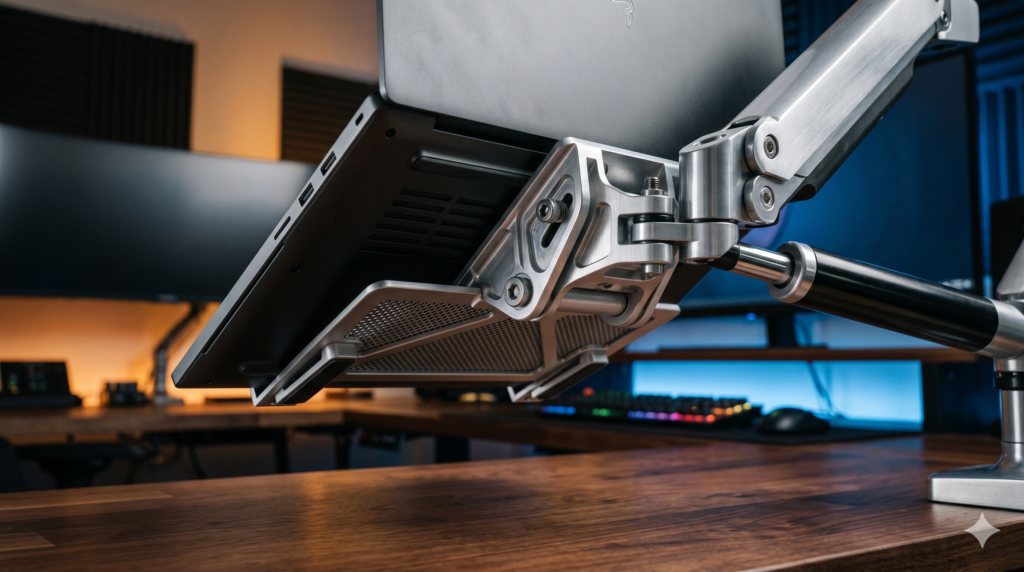
Monitor arms are designed around a screen bolted flat to the VESA plate. A laptop sits on a tray instead, further out from the arm’s joints and often heavier than people expect once the tray and cables are added. That is why a setup that looks fine on day one can slowly droop or tip forward.
This guide explains why sag happens, how to check your load against an arm’s rating, and how to set the arm up. The product section compares two arms using their published specifications, so you can see how to read a spec sheet before you buy.
Why a laptop sags on a monitor arm
An arm holds a load with a spring or gas cylinder that you tune to the weight on it. When the load sits further out on a tray, it adds leverage at the tilt joint, so the tray tends to tip forward even when the arm holds its height. Three things cause most sagging:
- The load is above the arm’s maximum. The spring or gas cylinder cannot hold it up.
- The tension is set for a different weight. Arms ship with a default setting that you adjust to your load.
- The tilt joint is too loose. The arm holds its height, but the tray tips forward.
The opposite problem also happens. If the load is below the arm’s minimum weight, the arm can drift upward and refuse to stay down.
Step 1: Add up the full load
Total load = laptop + tray + cables on the tray
- Take each weight from the product’s spec sheet, not a guess.
- Include the cables that hang from the tray, such as a charger cable or USB hub.
- Check that the total sits inside the arm’s range, with a margin from both ends.
- Example: a 6 lb laptop on a 2 lb tray is an 8 lb load. That fits inside both arms’ listed ranges below. (These numbers are only an example, so use your own.)
Step 2: Choose a tray that fits and ventilates
- VESA pattern: both arms in this guide list 75 x 75 mm and 100 x 100 mm, so the tray must use one of those.
- Weight limit: the tray must be rated for the laptop and everything on it.
- Vents: check where your laptop takes in air. If the intakes are underneath, the tray needs openings in those areas.
- Retention: a front lip or side clamps stop the laptop sliding when the tray is tilted. Make sure side clamps do not cover ports.
Step 3: Add grip between the laptop and the tray
Smooth metal or plastic can let a laptop creep forward when you type. Silicone anti-slip pads add grip under the laptop’s feet. Clean the tray before sticking them down, and keep them away from the intake vents.
How we checked
Sources and limits (checked 28 October 2026)
- Ergotron LX specifications come from Ergotron’s own LX Desk Monitor Arm product sheet (dated 2022).
- VIVO STAND-V101G1 specifications come from VIVO’s listing on Newegg Business, sold by VIVO.
- Retailer listings for the Ergotron LX disagree on capacity, from 9.1 kg to 11.3 kg. We use Ergotron’s sheet. An older 44 lb figure for VIVO belongs to a different model, the wall-mount MOUNT-V101G1.
- We could not confirm the exact WALI tray or the silicone pads behind our links, so we give no specifications for them.
- We have not tested these products ourselves.
The two arms compared
| Specification | Ergotron LX (45-241-026) | VIVO STAND-V101G1 |
|---|---|---|
| Type | Spring (Constant Force) | Pneumatic (gas spring) |
| Weight range | 7–25 lbs (3.2–11.3 kg) | 2.2–33 lbs |
| VESA | 75 x 75 and 100 x 100 mm | 75 x 75 and 100 x 100 mm |
| Height range | 13 in lift | 13 in of height adjustment |
| Tilt | 75° (70° up, 5° down) | +45° to −30° |
| Reach | Extension up to 25 in | Maximum arm extension 23 in |
| Desk mounting | 2-piece desk clamp and grommet mount included | Clamp (0.4–3.3 in desks) and grommet (0.4–1.9 in) |
| Warranty | 10 years | Not listed on the source we checked |
1. Ergotron LX Desk Monitor Arm
Strengths: Ergotron’s sheet lists a 10-year warranty and a 10,000-cycle motion test. It is a common choice for loads in the middle of its range.
Trade-offs: the 7 lb minimum matters for laptops. A light laptop on a light tray may fall below it, and then the arm will not stay down. The tilt is mostly upward (70° up, 5° down).
2. VIVO STAND-V101G1 Pneumatic Monitor Arm
Strengths: a wider weight range than the Ergotron, including a lower minimum, so it covers both light and heavy laptop loads. VIVO lists an elbow spring gauge for adjusting tension, and more downward tilt.
Trade-offs: the warranty is not listed on the source we checked. Check the clamp range against your desk thickness.
3. WALI Laptop Tray
The tray is the part the laptop actually sits on. We could not confirm which WALI model this link points to, so check these points on the listing before you order:
- The tray is VESA 75 x 75 or 100 x 100 mm, to match the arm.
- Its weight limit covers your laptop.
- It has openings under your laptop’s intake vents.
- It has a front lip or clamps that leave your ports clear.
- It is a tray only. Some WALI listings are complete arm-and-tray mounts.
4. Anti-slip silicone pads
Silicone pads add friction between the laptop and the tray. Check the size and adhesive type on the listing, clean the tray first, and keep the pads clear of the vents.
How to set up the arm and tray
- Assemble with the full load. Fix the tray to the arm, add the pads, and seat the laptop with its cables connected. Tension set on an empty arm will be wrong.
- Set the lift tension. If the arm drops when you let go, increase the tension. If it rises, reduce it. Make small changes as the arm’s manual describes, and test after each one.
- Set the tilt. If the tray tips forward while the arm holds its height, tighten the tilt joint as the manual describes.
- Check the vents. Make sure the tray and pads leave the intakes open. Re-check if the laptop runs hotter than usual.
Frequently asked questions
Why does a monitor arm sag with a gaming laptop on it?
A laptop on a tray sits out in front of the arm’s joints, so it adds leverage that a monitor of the same weight would not. If the total load is near or above the arm’s maximum, or the tension is set too low, the arm drops or the tray tips forward.
Can a monitor arm be too strong for a laptop?
Yes. Arms list a minimum weight as well as a maximum. Ergotron lists 7 to 25 lbs for the LX, and VIVO lists 2.2 to 33 lbs for the STAND-V101G1. If the laptop and tray weigh less than the minimum, the arm can drift upward instead of staying put.
How do I work out the total load?
Add the laptop’s weight, the tray’s weight and the cables that hang from the tray. Use the weights from each product’s spec sheet, then check that the total sits inside the arm’s listed range with some margin.
Does a laptop tray block the cooling vents?
It can if the tray is solid under the laptop’s intake vents. Check where your laptop takes in air, choose a tray with openings in those areas, and keep anti-slip pads away from the vents.
Which VESA pattern does a laptop tray need?
Both arms in this guide list 75 x 75 mm and 100 x 100 mm patterns. Check that the tray you buy lists the same pattern.
More laptop setup guides
Sources
- Ergotron LX Desk Monitor Arm product sheet (PDF, via Elkome)
- VIVO STAND-V101G1 listing on Newegg Business (sold by VIVO)
- Hunt Office listing for the Ergotron LX (shows a conflicting capacity)
- Listing showing the 44 lb figure for the MOUNT-V101G1 wall mount
- WALI tray and silicone pads: no spec page confirmed for the linked products.