
How to Hide Massive Gaming Laptop Power Bricks Under Your Desk
You’ve seen the beautiful “Desktop Replacement” setups online. A heavy-duty gaming laptop mounted flawlessly next to a massive ultrawide monitor, with not a single wire in sight. It looks like magic.
Then, you look at your own desk. Stretching across your floor is a massive, three-pound, 330W power brick the size of a cinder block. It has a rigid AC wall plug on one side, and an inflexible, thick DC barrel cable on the other. It acts like a tripwire, and it completely ruins the illusion of your setup. If you want to know how to hide a gaming laptop charger safely, you must abandon standard cable management practices.
At Desk & Console, we treat heavy cable management like structural engineering. You cannot use cheap zip-ties and plastic boxes to tame thick, high-voltage wires. To achieve a perfectly stealthy, thermally safe battlestation, you must invest in industrial-grade hardware. Here is the ultimate technical guide to under-desk mounting heavy power bricks.
The Physical Challenges of 330W Bricks
Standard office laptops (like a MacBook Air) use thin, highly flexible USB-C charging cables. Gaming laptops are entirely different beasts. They utilize massive DC Barrel Connectors containing thick copper gauges designed to safely transport high-voltage electricity without catching fire.
📐 The “Bending Radius” Bottleneck
Because the cables are so thick, they have a strict bending radius. If you try to force the thick cable coming out of your power brick to immediately make a 90-degree turn so it sits flush against a cable box wall, you will severely stress the internal copper wires. Over time, the rubber casing will split, exposing live wires, or the internal solder joints will snap, completely destroying a $150 proprietary charger.
The Solution: You must mount the brick using hardware that allows the thick cables to protrude straight out for at least two inches before beginning a gentle curve.
| Mounting Method | Thermal Safety | Weight Capacity |
|---|---|---|
| Enclosed Plastic Cable Box | Severe Overheating Risk | Rests on floor (Ugly) |
| Plastic J-Channel Raceways | Passes | Fails (Brick is too heavy/wide) |
| Open-Air Steel Wire Basket | Flawless (Passive Cooling) | Flawless (Holds 15+ lbs) |
The Heavy-Duty Hardware Arsenal
To safely offload 3 pounds of high-voltage hardware from your floor to the underside of your desk, you must invest in structural, industrial-grade routing gear. These four components are mandatory for a safe, invisible setup.
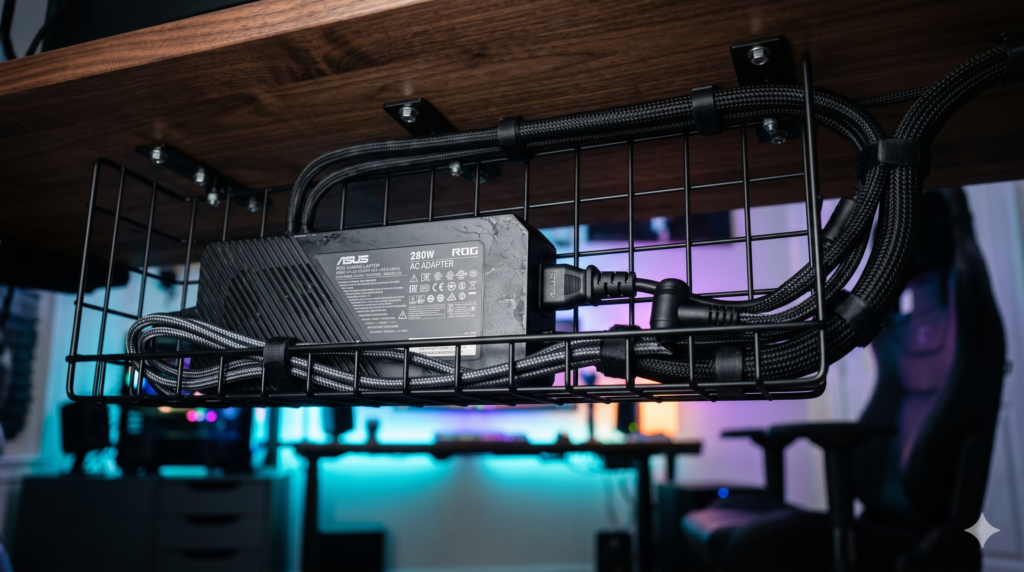
1. The Thermal Mount: VIVO Under Desk Wire Basket 🏆 Essential Airflow
If you want to hide a massive gaming laptop charger, the VIVO Heavy-Duty Wire Basket is the undisputed champion of the battlestation community. It is deep enough (over 4 inches) to comfortably hold the thickest Alienware, ASUS, or MSI power bricks lying completely flat.
It comes with solid steel mounting brackets that screw directly into solid-wood desks. Because the basket is completely open, you can lay your power strip inside it, plug your laptop charger in, and use velcro ties to secure the excess thick wiring flat against the metal grid, ensuring nothing droops beneath the sightline of your desk.
Check Price on Amazon2. The Hollow-Desk Fix: 3M VHB Heavy Duty Tape
If you cannot use the wood screws provided with the wire basket above, 3M VHB Double-Sided Tape is your savior. This is not standard craft tape; VHB is an industrial acrylic adhesive used in automotive and aerospace manufacturing.
Instead of trying to stick the hot, heavy power brick directly to the underside of the desk (where the heat will eventually melt the adhesive and cause it to crash onto your feet), you apply the VHB tape to the metal mounting brackets of the VIVO Wire Basket. Press the brackets firmly to the underside of your glass or hollow desk, let it cure for 24 hours, and you will have a permanent, drill-free steel vault for your charger.
Check Price on Amazon3. The Clearance Saver: Right-Angle AC Adapter
This is the greatest $10 hack in PC cable management. Most massive gaming laptop chargers use a standard C13 (Desktop PC style) or a C5 “Mickey Mouse” style connector. Because the cable is so thick, it requires massive clearance inside your wire basket.
Buy a dedicated Right-Angle AC Power Adapter or a replacement right-angle cable. This forces the heavy wall cord to immediately make a sharp 90-degree turn the exact millimeter it leaves the power brick. This drastically reduces the total physical footprint of your power supply, allowing it to easily fit horizontally inside your under-desk wire basket without mashing the cable against the wall.
Check Price on Amazon4. The Stealth Route: Alex Tech Braided Sleeves
The final step in achieving the “floating” zero-cable look. Once your power brick is safely tucked into the wire basket under your desk, you must route the DC cable up to the laptop. If you are using a gas-spring monitor arm to hold your laptop, wrap the thick power cable alongside your display cables using the Alex Tech Expandable Braided Sleeve.
You bundle the cables starting at the laptop’s rear I/O, wrap them inside the sleeve, and strap the entire sleeve to the spine of the monitor arm using Velcro ties. To the naked eye, it looks like a single, sleek umbilical cord delivering power and data to your floating machine. The power cord seemingly appears out of nowhere.
Check Price on AmazonStep-by-Step Under-Desk Mounting Guide
Follow these exact steps to ensure your massive laptop charger never falls down onto your feet while gaming.
Identify the Thermal Zone
Do not mount the power brick directly behind where your knees or thighs rest under the desk. It generates extreme heat. Mount the wire basket (or tape the brick brackets) to the far back-left or back-right corner of your desk, aligning it with the monitor arm pole to minimize visible cable travel.
Execute the Mount (Screw vs. Adhesive)
For Solid Wood Desks: Hold the VIVO wire basket against the underside of the desk and mark the holes with a pencil. Pre-drill tiny pilot holes (to prevent the wood from splitting), and drive the included wood screws in. Drop the power brick inside.
For Glass/Ikea Desks: Clean the mounting brackets of the wire basket and the underside of the desk with rubbing alcohol. Apply the 3M VHB Tape to the brackets. Press the brackets firmly against the underside of the desk and hold strong pressure for 60 seconds. Crucial: Do not put the power brick inside the basket for 24 hours to let the chemical bond cure.
Route the ‘Ghost’ Cable
Run the thick DC cable from the under-desk brick, up the central pole of your monitor mount. Bundle it into the braided cable sleeve alongside your display cords. Fasten the cable tightly to the back edge of your laptop stand using a Velcro tie to relieve any mechanical tension on the laptop’s power port.
Hiding massive power bricks isn’t just about aesthetics; it is about structural safety and thermal management. By abandoning cheap plastic boxes and investing in a heavy-duty Open-Wire Steel Tray secured with 3M VHB Tape, you guarantee your 330W chargers stay cool and firmly locked under your desk, completely invisible from your eye line.
Frequently Asked Questions (FAQ)
Is it safe to put a laptop power brick in a cable management box?
For a standard 65W office laptop, yes. For a 240W to 330W gaming laptop, absolutely not. Gaming laptop power bricks act as massive AC/DC electrical transformers and generate immense radiant heat under heavy GPU load. Placing them inside an enclosed plastic cable management box restricts all airflow, creating a thermal oven that will permanently damage the power supply, cause random laptop shut-offs, and create a genuine fire hazard.
How to hide a gaming laptop charger on a glass or Ikea desk?
You cannot use screws on tempered glass or hollow-core Ikea desks (like the LINNMON), as they will shatter the glass or rip instantly out of the hollow cardboard interior. To mount an under desk mount for a heavy power brick, you must use industrial-grade 3M VHB (Very High Bond) double-sided tape. Apply the VHB tape to the metal mounting brackets of a wire basket, and press it directly against the underside of the desk frame, letting it cure for 24 hours.
How do you cable manage a thick laptop power cord?
Because gaming laptop power cords (the DC cable that plugs into the PC) are incredibly thick and rigid, they cannot make sharp 90-degree turns without damaging the internal copper wire. The secret to hiding them is routing the thick cable up the back spine of your monitor arm, wrapping it tightly inside an expandable braided cable sleeve with your other cables. This creates a stealthy umbilical cord that blends in perfectly.