
How to Mount a Heavy Gaming Laptop to a Monitor Arm (Without Sagging)
A true battlestation requires immense desk space. If you want to use a massive extended mouse pad for low-DPI FPS gaming and a full-size mechanical keyboard, you cannot have a massive 17-inch gaming laptop permanently glued to your desk surface.
The aesthetic dream is the “Floating Battlestation.” You attach your laptop to a pneumatic gas-spring monitor arm, elevating it off the desk so it aligns perfectly with your main gaming monitor. But when you try to execute this with a 6-to-8 pound gaming behemoth (like an Alienware m18, Lenovo Legion, or ASUS ROG Strix), reality sets in. You let go of the laptop, and the monitor arm instantly droops. The tray tilts aggressively forward, and your $3,000 laptop threatens to slide right off onto the floor.
At Desk & Console, we treat battlestation setups like structural engineering. If you want to safely achieve the “floating laptop” aesthetic with high-end gaming hardware, you must understand the physics of gas-spring tension, VESA hole patterns (75×75 vs 100×100), and why you must invest in heavy-duty mounts. Here is the ultimate technical guide to a flawless gaming laptop VESA tray setup.
How to Calculate Your Total Mount Weight
Before you buy any hardware, you must perform a payload calculation. The secret to a stable floating setup is the 20% Overhead Rule. You never want to run a monitor arm at 100% of its maximum advertised capacity, as it will slowly degrade the gas spring over time.
⚖️ The True Payload Formula
You cannot just check your laptop’s weight. A monitor arm must hold the combined weight of the entire structural assembly. VESA laptop trays are made of thick, heavy steel.
A standard $30 Amazon Basics monitor arm advertises a “14 lb max capacity.” If you put an 11.2 lb payload on it, you are running at 80% capacity. With the offset torque of the laptop tray, the arm will struggle to elevate and the tilt hinge will fail immediately.
To mount a heavy gaming laptop, you must buy a heavy-duty arm rated for at least 20 to 25+ pounds.
The Heavy-Duty ‘Floating’ Arsenal
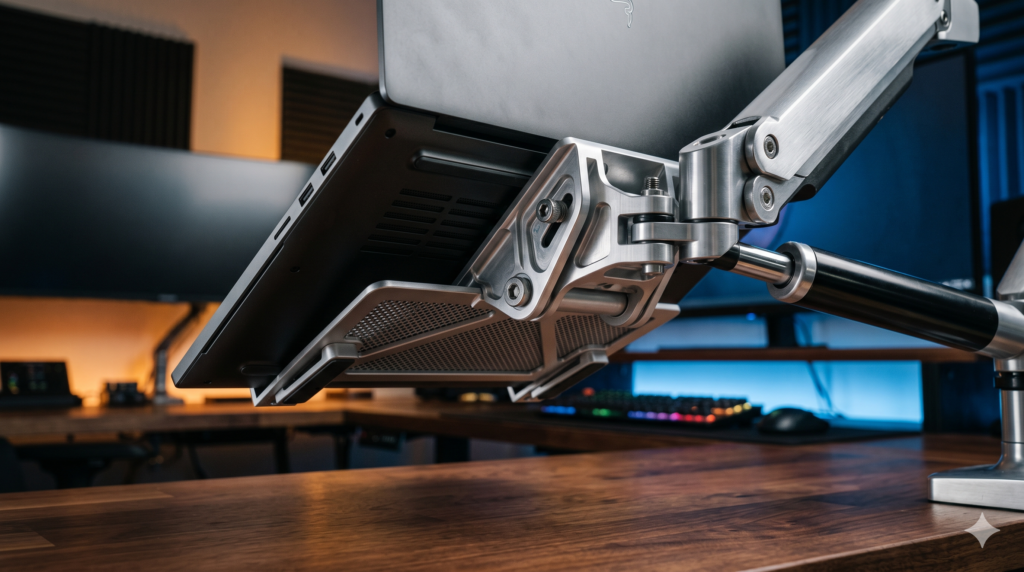
To safely elevate a heavy gaming laptop, you need a VESA arm with industrial-grade tilt joints, and a laptop tray that features built-in safety clips and massive airflow vents.
1. The King of Tension: Ergotron LX Desk Mount 🏆 Unrivaled Tension
If you have a $3,000 gaming laptop, you do not trust it to a $30 piece of plastic. The Ergotron LX is the undisputed champion of the heavy-duty mounting world. Built entirely from polished aluminum and steel, it is the mount of choice for hospitals and industrial engineering firms.
What makes it perfect for a gaming laptop VESA tray setup is the rigidity. Even when you extend the arm 25 inches out over your desk, it exhibits exactly zero wobble when you type. It supports both 75x75mm and 100x100mm VESA patterns, meaning any laptop tray on the market will bolt to it flawlessly.
Check Price on Amazon2. High-Capacity Budget: VIVO Premium Heavy Duty Arm
If you cannot afford the Ergotron, the VIVO Premium Aluminum Arm (STAND-V101G1) is the greatest high-capacity budget alternative on the market. It utilizes an ultra-thick pneumatic gas spring specifically designed for massive ultrawide monitors, meaning it easily overpowers the weight of a gaming laptop.
It features exceptional internal cable management channels. You can run your laptop’s massive power brick cable and your DisplayPort cable directly inside the metal arm housing, preserving the pristine, floating aesthetic of your battlestation without messy wires draping onto your desk.
Check Price on Amazon3. The Airflow Savior: WALI Ventilated VESA Laptop Tray
A monitor arm is useless without a tray to actually hold the laptop. The WALI Ventilated Laptop Tray is the industry standard for gamers for two crucial reasons.
First, the massive ventilation holes ensure your laptop’s fans can breathe. Second, and most importantly, it features front retaining clips and side-hugging brackets. Gaming laptops are incredibly thick (often over 1 inch at the back). Standard trays only have a half-inch front lip; a thick gaming laptop will literally slide right over it and fall. The WALI’s deep retaining clips securely lock thick 16-inch and 17-inch chassis in place.
Check Price on Amazon4. The Friction Failsafe: 3M Silicone Anti-Slip Grips
This is a $10 cart-stuffer that will save your $2,000 laptop. Even with a premium ventilated tray and front clips, metal on metal is dangerous. The heavy vibrations of typing heavily on your desk or using a sim-racing wheel can cause the laptop to slowly slide sideways on the VESA tray.
Buy a pack of 3M Silicone Anti-Slip Pads. Stick them aggressively to the top surface of the metal VESA tray. When you rest your heavy gaming laptop down, the rubber feet of the laptop will bite into the silicone pads, creating a locked, high-friction seal that refuses to budge.
Check Price on AmazonStep-by-Step Tension Adjustment Guide (Stop the Droop)
Even if you buy a premium 33 lb monitor arm, it will droop out of the box. Gas-spring arms are shipped from the factory with minimum tension so they don’t explosively spring open during unboxing. You must calibrate it to your specific payload.
Bolt the Payload First
Never adjust a gas-spring arm while it is empty. Bolt the VESA tray to the arm. Place your laptop onto the tray. Route all of your power and display cables along the arm. You must adjust the tension with the total final weight applied to the system.
Adjust the ‘Lift’ Tension (The Main Cylinder)
If the arm slowly sinks toward your desk, locate the hex-key screw at the middle joint of the main arm. While pushing the arm down to make it perfectly horizontal, insert your Allen wrench and turn it toward the “+” (Plus) symbol. You may have to turn it 10 to 15 full rotations to build enough hydraulic pressure to suspend an 8 lb laptop.
Lock the ‘Tilt-Pivot’ Tension (The Tray Hinge)
If the arm is floating perfectly, but the tray itself is tilting forward and dumping your laptop, locate the nut directly behind the VESA mounting plate. This is the tilt-pivot hinge. Take a socket wrench or the provided Allen key and crank this nut as tight as physically possible. Heavy laptops have an offset center of gravity; this hinge requires immense clamping force to stay rigid.
Frequently Asked Questions (FAQ)
Why is my monitor arm sagging with my laptop on it?
Monitor arms sag with laptops for two reasons: uncalibrated lift tension and weak tilt-pivot joints. Gaming laptops have a massive offset center of gravity because their heavy copper heatsinks and batteries are located at the back hinge. This weight acts as a lever, overpowering the tilt mechanism of cheap office mounts and causing the laptop tray to droop forward. You must upgrade to a heavy-duty arm and tighten the VESA hinge bolt aggressively.
Will a laptop tray block my gaming laptop’s cooling fans?
If you use a solid metal or plastic tray, yes. Gaming laptops pull cold ambient air directly through intake vents on the bottom chassis. A solid tray will instantly choke your laptop’s fans and cause severe thermal throttling. You must use a ventilated VESA laptop tray with large cutout holes to allow ambient air to reach the laptop chassis.
What is the difference between VESA 75×75 and 100×100?
VESA refers to the standard millimeter distance between the four mounting screws on the back of a monitor or a laptop tray. 75×75 means the holes form a square 75mm apart. Almost all premium heavy-duty monitor arms and laptop trays support both 75x75mm and 100x100mm patterns via an X-shaped universal cross-bracket, ensuring guaranteed compatibility.