
How to Hide Webcam and Mic Cables on Dual Monitor Arm Setups
You did the hard work. You unboxed a massive dual monitor arm, clamped it to your desk, and achieved that beautiful “floating screen” aesthetic. Your workspace looks immaculate. And then… you have to plug in your peripherals.
A stiff USB cable juts awkwardly out of the back of your 4K webcam, draping lazily over your primary monitor bezel. Your heavy XLR microphone cable drops onto your desk like a dead snake. Suddenly, your premium $3,000 dual-monitor battlestation looks like an IT closet disaster. The floating monitor aesthetic completely fails if the peripheral wires aren’t invisible.
Routing auxiliary cables through moving, mechanical arms requires a structural, architectural approach. At Desk & Console, we obsess over zero-clutter cable architecture. This guide provides the exact step-by-step routing methodology, along with the specific “invisible tech” toolkit needed to seamlessly hide heavy webcam and mic cables without restricting your dual monitor movement.
The Zero-Clutter Arsenal: What You Will Need
You cannot achieve a flawless, stealthy route using standard factory wires and scotch tape. You need these exact five items to manipulate routing angles, relieve tension, and merge multiple thick cables into single, invisible lines.
1. AuviPal Right-Angle USB Adapters
2. Alex Tech Expandable Braided Cable Sleeve
3. VELCRO Brand ONE-WRAP Thin Ties
4. Anker 4-Port USB 3.0 Ultra Slim Hub
5. HUANUO Dual Monitor Gas Spring Mount
Actionable Step-by-Step: Routing Cables Through Gas-Spring Arms
The Right-Angle Drop (Fixing the Webcam)
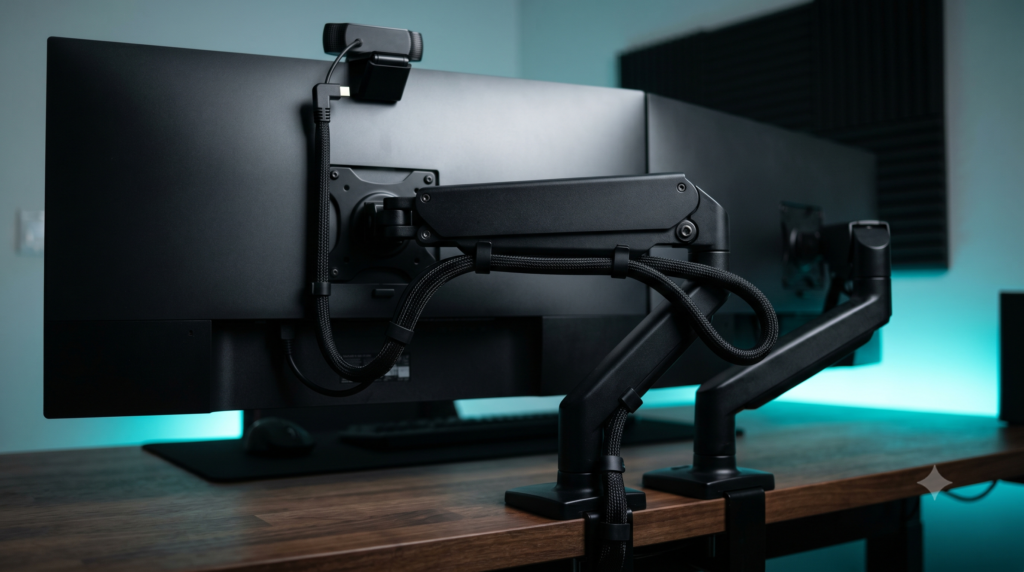
Mount your webcam to the top-center of your primary monitor. Unplug the factory cable from the back of the camera, attach the 90-degree Right Angle Adapter, and plug the cable back in so it points directly at the floor. Run the wire flat against the back plastic housing of the monitor. Secure it with a small piece of electrical tape or a sticky cable-clip directly above the VESA mounting plate to prevent it from swinging.
Consolidating the ‘Umbilical Cord’
At the point where the monitor connects to the VESA plate, you now have three or four cables converging: The Monitor Power Cord, the DisplayPort cable, your Webcam USB, and potentially your Microphone USB. Wrap all of these cables into the Braided Cable Sleeve starting exactly at the VESA mount. You have now turned a messy cluster of wires into one thick, professional-looking tether.
Routing the Gas-Spring Raceways
High-quality dual mounts feature plastic raceway covers on the underside of the arms. Pop these plastic covers off. Take your newly sleeved “Umbilical Cord” and press it flat into the metal channel of the upper arm segment. Snap the plastic cover back on. If your mount does not have built-in raceways, use two Velcro Ties per arm segment to strap the sleeve tight against the bottom edge of the metal.
The Art of Mechanical Slack (The Service Loop)
This is the most crucial step. A gas-spring arm features an “Elbow Joint” in the middle. If the cables are pulled tight while the arm is folded backward toward the wall, the moment you pull the monitor forward toward your face, the arm will extend, run out of cable length, and violently rip the USB cord out of your webcam.
To fix this, pull your monitor to the absolute furthest distance, highest height, and extreme tilt you will ever use. Then route the cable through the elbow joint, leaving a 2- to 3-inch “Service Loop” (a small U-shaped dip of slack) right at the hinge. Fasten lightly with a Velcro Tie just above and below the hinge. This guarantees the cables will never pinch.
Taming Heavy XLR Mic Cables
If you use a premium XLR microphone (like a Shure SM7B) mounted to a boom arm next to your monitors, the thick audio cable will likely not fit inside the monitor arm’s plastic raceways. Do not force it and break the plastic clips. Instead, run the XLR cable along the outside bottom edge of the arm. Secure it every 6 inches with black Velcro ties. Because it runs perfectly parallel along the bottom ridge, it remains completely invisible from a standard seated viewing angle.
Terminating at the Under-Desk Hub
Route the bundled cables down the central mounting pole of your dual arm, dropping them directly beneath the desk surface. Mount your Anker Powered USB Hub to the underside of your desk using heavy double-sided mounting tape. Plug the Webcam USB (and your microphone USB) directly into this hub. Now, instead of running multiple distinct peripheral cables 6 feet across your floor, you only have to run a single USB data cable from the hub to the PC tower.
Achieving the “floating screen” aesthetic requires structural planning, not just zip ties. By utilizing Right-Angle Adapters to kill the cable loop, merging wires into a Braided Sleeve, and terminating peripherals at an Under-Desk USB Hub, your webcam and mic cables will become virtually invisible. The result is a highly functional, distraction-free battlestation that looks flawless on camera and moves freely without breaking your gear.
Frequently Asked Questions (FAQ)
Should I use zip ties on my monitor arm cables?
Never use plastic zip ties on a gas-spring monitor arm. Because the arms are designed to move and articulate, stiff zip ties will violently pull against the cables when you adjust your screen, leading to frayed wires or ripped USB ports. Always use heavy-duty, reusable Velcro ties that allow the cables to flex and breathe inside the tie loop.
What is a ‘slack loop’ in cable management?
A slack loop (or service loop) is a calculated amount of extra wire left at the ‘elbow’ joints of a monitor arm or mic boom arm. If you route a cable completely tight against a folded arm, pushing the monitor away from you will snap the cable. A slack loop (usually 2 to 3 inches of drooping cable at the hinge) ensures the arm has the physical freedom to achieve its full range of motion.
Do right-angle USB adapters affect webcam quality?
No. As long as you purchase a high-quality USB 3.0 or USB 3.1 right-angle adapter capable of 5Gbps data transfer, your 4K webcam or streaming camera will function flawlessly. There will be zero added latency, zero quality loss, and your cable management will look infinitely more professional.