How to Cable Manage Thick XLR Cords Under Your Desk
You’ve finally built the ultimate content creator setup. You dropped $400 on an elite broadcast microphone—like the Shure SM7B or Electro-Voice RE20—clamped a premium metal boom arm to your desk, and hooked it up to a high-end audio interface. From the camera’s perspective, your stream looks immaculate.
But when you look down at your desk, the illusion shatters. Hanging awkwardly from the back edge of your desk is a massive, incredibly thick, stiff rubber XLR cable. It doesn’t bend fluidly like a thin USB mouse cord. It stubbornly fights every attempt to hide it, pooling into an ugly, heavy rat’s nest on the floor before finally plugging into your audio mixer. XLR cable management on a boom arm is an entirely different beast than hiding normal PC wires.
At Desk & Console, we treat cable management as structural engineering. Hiding streaming wires requires accommodating dynamic movement (the boom arm swinging back and forth) without damaging internal copper conductors. You cannot force an XLR cable to bend sharply. You must route it seamlessly using soft-touch materials, open raceways, and proper slack loops. Here is the ultimate technical blueprint to hide XLR cables on a desk.
The Physics of Pro-Audio Cables
📐 The “Bend Radius” Constraint
In structural cabling, the “bend radius” is the minimum radius a cable can be bent without kinking it, damaging it, or shortening its life. For premium XLR cables (like Mogami Gold or standard thick-gauge XLRs), the rule is simple: Never bend the cable tighter than the curve of a standard coffee mug.
If you try to forcefully fold a stiff XLR cable perfectly flat against a sharp 90-degree desk corner to hide it, the outer rubber jacket will stretch, and the internal copper shielding will permanently warp. You must use cable management raceways that allow the cable to gently curve naturally as it drops under the desk.
| Cable Routing Method | Audio Fidelity Risk | Aesthetic Result |
|---|---|---|
| Plastic Zip-Ties | Severe (Pinched shielding causes hum) | Clean, but destroys gear |
| Enclosed Plastic Cable Boxes | Moderate (Forces tight 90° bends) | Hides wires, but creates kinks |
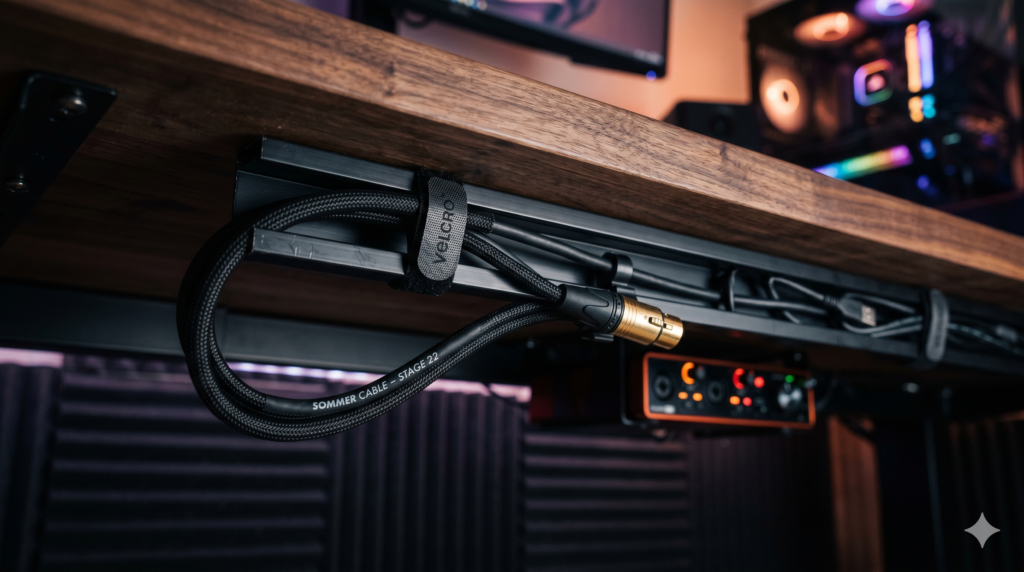
| J-Channel Raceways & Velcro | Zero (No pinching, gentle curves) | 100% Invisible “Zero-Cable” Look |
The Heavy-Duty Routing Toolkit
To safely route a heavy XLR cable from a moving boom arm down to an audio interface (like a GoXLR or Focusrite Scarlett), you cannot rely on a single product. Cable management is an ecosystem. You need these four specific tools to execute the perfect route without introducing tension points.
1. The Structural Base: VIVO Under Desk J-Channel 🏆 Essential Backbone
If you want to know how to hide XLR cables on a desk permanently, the VIVO Heavy-Duty Under Desk J-Channel is the architectural backbone of your setup. This raceway relies on strong adhesive tape or physical screws, ensuring it never sags under the weight of pro-audio wires.
Unlike cheap wire baskets that allow thick black cables to droop visibly between the metal grid gaps, the J-channel is completely solid from the front. When mounted to the back edge of your desk, the cables vanish entirely. It is deep and wide enough to hold a thick XLR cable, a heavy monitor power cord, and a braided DisplayPort cable simultaneously without crowding.
Check Price on Amazon2. The Shield Preserver: VELCRO Brand ONE-WRAP
If you are building a professional audio setup, throw your plastic zip-ties in the trash. The VELCRO Brand ONE-WRAP Roll is the secret weapon of touring audio engineers and high-end studio builders.
You cut this soft, double-sided Velcro to your exact desired length using scissors. It allows you to strap the heavy XLR cable tightly to the spine of your boom arm without applying dangerous, concentrated pressure to the internal wiring. Better yet, because it is infinitely reusable, you can easily loosen the straps if you need to adjust the cable slack later (which is impossible with a one-time-use zip-tie).
Check Price on Amazon3. The Monitor Arm Fix: Alex Tech Braided Sleeves
For creators obsessed with the “Zero-Cable” aesthetic, raw rubber XLR cables are a major visual distraction. The Alex Tech Expandable Braided Cable Sleeve solves this instantly.
This split-sleeve design allows you to pry open the side, push the thick XLR cable inside, and let it snap shut. It gives the ugly rubber cord a premium, paracord-like texture. If you have an external webcam USB cable or headphone extension running along the same boom arm, you can shove both cables inside a single sleeve, creating a perfectly clean, unified “umbilical cord” that routes seamlessly to your PC.
Check Price on Amazon4. Steel Frame Anchor: Anker Magnetic Cable Clips
The final puzzle piece of hiding streaming wires is the vertical drop. The Anker Magnetic Cable Clips are brilliant engineering. Instead of using sticky adhesives that ruin the paint on your expensive standing desk frame, these use powerful neodymium magnets.
You snap the heavy XLR cable into the soft silicone clasp, and magnetically snap the clip directly to the back of your desk’s steel leg. The magnets are strong enough to hold the weight of pro-audio cables, ensuring the wire travels perfectly straight down to the floor without dangling loosely in the air behind your setup.
Check Price on AmazonThe 3-Zone Dynamic Routing Strategy (Step-by-Step)
To execute a flawless XLR cable management boom arm setup, you cannot just start taping wires randomly. A mic arm is dynamic—it extends and rotates. You must route the cable sequentially through three distinct zones to ensure the microphone can still move freely without ripping the cable out.
Zone 1: The Boom Arm Run (The Service Loop)
Plug the XLR into your microphone. Route the cable along the top spine of the boom arm. Crucial Step: When you reach a hinge or an elbow joint on the arm, leave a 2 to 3-inch loop of “slack” in the wire before strapping it down with the Velcro ONE-WRAP. This is called a “Service Loop.” If you strap the wire perfectly tight across a hinge, the moment you bend the arm toward your face, the tension will snap the internal copper wire.
Zone 2: The Desk-Clamp Transition
When the cable reaches the C-clamp at the back of your desk, do not let it hang freely in the air. Immediately route the heavy wire straight down, wrapping it gently around the back of the clamp base, and direct it into the VIVO J-Channel mounted underneath your desk edge. The rigid J-Channel will now support 100% of the cable’s weight, ensuring it doesn’t pull backward on your mic arm.
Zone 3: The Under-Desk Raceway
Run the XLR cable horizontally through the J-Channel toward your audio interface (like a GoXLR, Elgato Wave XLR, or Focusrite Scarlett). EMI Safety Rule: If you have massive laptop power bricks mounted under your desk, keep the XLR cable as far away from them as possible. Power bricks emit strong electromagnetic fields. Even with heavy shielding, laying an audio cable directly parallel to a 330W power brick can introduce a faint static hum into your microphone feed. Ensure audio and power cables cross at 90-degree angles if they must intersect.
Heavy broadcast cables demand structural respect. By abandoning cheap zip-ties and utilizing the rigid support of an Under-Desk J-Channel Raceway combined with the pressure-free fastening of Velcro ONE-WRAP, you protect the delicate copper shielding of your XLR cables while executing a flawless, invisible aesthetic that looks phenomenal on camera.
Frequently Asked Questions (FAQ)
How do you hide XLR cables on a desk?
To hide XLR cables on a desk, you must route them along the spine of your boom arm using reusable Velcro ties. At the desk clamp, create a loose “strain relief loop” to allow arm movement, then immediately drop the thick cable into a rigid under-desk J-channel raceway that routes the cord invisibly to your audio interface.
Can you use zip ties on XLR cables?
No, you should never use plastic zip ties on professional XLR cables. Pulling a zip tie too tight will crush the internal braided copper shielding. This breaks the cable’s defense against electromagnetic interference (EMI), resulting in permanent static or humming noises in your audio. Always use soft Velcro straps for pro-audio wiring.
What is the best under desk cable tray for heavy wires?
For thick, heavy wires like XLR and heavy-gauge power cords, you should avoid open wire-mesh baskets (where the cables can visibly sag through the gaps). The best solution is a solid PVC or steel J-channel raceway. J-channels provide a solid floor that completely conceals heavy cables while allowing you to easily drop cords in and out from the open top lip without harsh bending.